a toolkit for tangible multi-touch surfaces
reacTIVision is an open source, cross-platform computer vision framework for the fast and robust tracking of fiducial markers attached onto physical objects, as well as for multi-touch finger tracking. It was mainly designed as a toolkit for the rapid development of table-based tangible user interfaces (TUI) and multi-touch interactive surfaces. This framework has been developed by Martin Kaltenbrunner and Ross Bencina as the underlying sensor component of the Reactable, a tangible modular synthesizer that has set the standards for tangible multi-touch applications.
please note: reacTIVision is the computer vision framework of the Reactable synthesizer. This open source package does therefore not contain any sound or visualization software components, which are also not available separately. If you are interested in purchasing a Reactable you can find further information at reactable.com.

reacTIVision screenshot

fiducial marker example
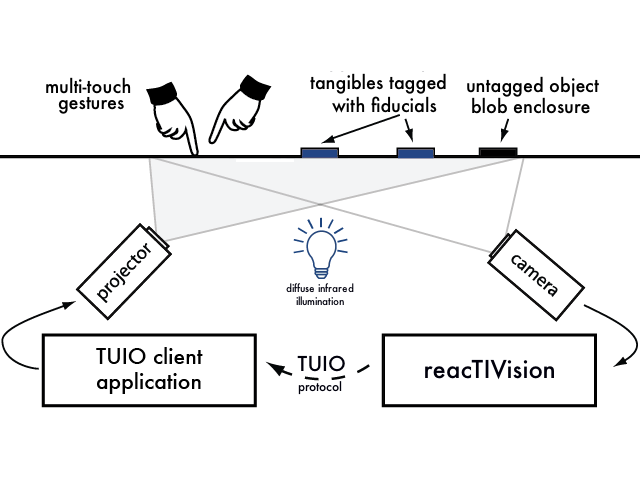
framework diagram

TUIO simulator
reacTIVision is a standalone application, which sends TUIO messages via UDP port 3333 to any TUIO enabled client application. The TUIO protocol was initially designed for encoding the state of tangible objects and multi-touch events from an interactive table surface such as the Reactable. The framework includes a set of free TUIO client examples for various programming languages, which serve as the basis for the development of tangible user interface applications. As an alternative to TUIO, the application is also capabable of sending MIDI messages for the direct use with MIDI sequencers.
The reacTIVision application currently runs under the following operating systems: Windows, Mac OS X and Linux. Under Windows it supports any camera with a proper WDM driver, such as most USB, FireWire and DV cameras. Under Mac OS X most UVC compliant USB as well as Firewire cameras should work. Under Linux FireWire cameras are as well supported as many Video4Linux2 compliant USB cameras.
reacTIVision files
NEW!: reacTIVision 1.5.1 is a maintenance release which provides several bug fixes and updated builds for all platforms, also introducing a 64bit build and other significant improvements for Windows systems. For Mac OS X it is recommended to use the 64bit build for Mac OS X 10.8 or later, which provides better performance and camera support. The 32bit binary for Mac OS X is a legacy build for Intel 32bit processors on Mac OS X 10.5 or later. For Windows it is recommended to use the 64bit build for Windows 7 64bit or later, which is optimized for Intel processors with AVX extension. The 32bit binary for Windows is available for 32bit systems and older processors on Windows XP or later.
reacTIVision vision engine
release history
|
reacTIVision TUIO clients
TUIO Simulator
public source repositoryThe reacTIVision and TUIO source code is now hosted on Github. If you are interested in contributing to the development you are welcome to sumbmit your improvements there. third party TUIO softwareYou can find a growing list of further TUIO client implementations as well as other TUIO enabled multi-touch or fiducial trackers at the new software page over at TUIO.org |
references
Please refer to the following publications for further details on the reacTIVision and TUIO framework. We'd also appreciate if you could cite one or more of these papers in your own publications instead of just providing the URL to this project web site.- Kaltenbrunner, M. & Bencina, R. "reacTIVision: A Computer-Vision Framework for Table-Based Tangible Interaction", Proceedings of the first international conference on "Tangible and Embedded Interaction (TEI07). Baton Rouge, Louisiana. [PDF]
- Kaltenbrunner, M. & Bovermann, T. & Bencina, R. & Costanza, E. "TUIO - A Protocol for Table-Top Tangible User Interfaces", Proceedings of the 6th International Workshop on Gesture in Human-Computer Interaction and Simulation (GW 2005), Vannes, France [PDF]
- Kaltenbrunner, M. "reacTIVision and TUIO: A Tangible Tabletop Toolkit", Proceedings of the ACM International Conference on Interactive Tabletops and Surfaces (ITS2009). Banff, Canada. [PDF]
- Bencina, R. & Kaltenbrunner, M. & Jordà, S. "Improved Topological Fiducial Tracking in the reacTIVision System", Proceedings of the IEEE International Workshop on Projector-Camera Systems (Procams 2005), San Diego, USA [PDF]
- Bencina, R. & Kaltenbrunner, M. "The Design and Evolution of Fiducials for the reacTIVision System", Proceedings of the 3rd International Conference on Generative Systems in the Electronic Arts (3rd Iteration 2005), Melbourne, Australia [PDF]
- Echtler, F. & Kaltenbrunner, M. "SUR40 Linux: Reanimating an Obsolete Tangible Interaction Platform", Proceedings of the ACM International Conference on Interactive Surfaces and Spaces (ISS2016), Niagara Falls, Canada [PDF]
licensing
reacTIVision is free software provided under the GPL license. This means that you can freely use this software for any private, academic and commercial purpose, while any changes or inclusion of its actual source code into third party project needs to be published under the same (or later) GPL licence. The related TUIO reference implemenations and clients are available under the LGPL, license which both allows its inclusion in open and closed source projects, while only the changes to the actual libraries need to be published under the same LGPL license.
The provided amoeba fiducial sets are bound to be used in conjunction with the actual reacTIVision software only. Any other use of these symbols, for example in derived third party applications or in graphic design is not permitted without a dedicated license!
donations
Since the development also causes significant spending in hardware for testing purposes, we would appreciate any donations from our users. In case you are developing a commercial project with our software framework, we suggest an amount between 5-10% of your overall production budget, at your choice. If you are willing to support the further development and improvement of reacTIVision, please press the "Donate" button provided at the top of this page.
support
If you have any questions regarding the usage of the reacTIVision framework in general and the TUIO clients please read and post to our reacTIVision user forum hosted on sourceforge.net. If you want to submit a patch to the general code base please submit a pull request to the open source repository on Github. In case you are looking for extended support regarding the construction or purchase of an interactive table platform, you should consider the professional services provided by Reactable Systems.
how does it work?
As listed above, several papers have been published that describe the internal structure of reacTIVision and libfidtrack in great detail. In a nutshell the system works like this: reacTIVision tracks specially designed fiducial markers in a real time video stream. The source image frame is first converted to a black&white image with an adaptive thresholding algorithm. Then this image is segmented into a tree of alternating black and white regions (region adjacency graph). This graph is then searched for unique left heavy depth sequences, which have been encoded into the fiducial symbol. Finally the found tree sequences are matched to a dictionary to retrieve an unique ID number. The fiducial design allows the efficient calculation of the marker's center point as well as its orientation. OSC messages implementing the TUIO protocol encode the fiducials' presence, location, orientation and identity and transmit this data to the client applications.
Additionally reacTIVision uses the result of the image segmentation in order to retrieve and identify small round white blobs as finger tips on the surface. A quick and dirty shape matching algorithm selects the actual finger blobs from the possible region candidates. A complementary blob tracking algorithm is also taking advantage of the same data in order to track eventually not recognized fiducials, for example where fast movements destroy the actual fiducial structure in the image.
building the table
table & surface
A camera and a projector with wide-angle lenses need to be placed underneath the table, so they can both cover the entire surface. Alternatively a mirror can be used in order to achieve a larger projection distance. For the interactive surface itself a normal perspex board can be used in conjunction with some ordinary tracing paper on the top side for the projection. This material is completely transparent for objects and finger tips in direct contact with the surface. In order to avoid direct reflections of the light source and projector lamp, the lower side of the surface should have a matte finish, while maintaing the overall transparency.
illumination
For the tracking, the objects need to be properly illuminated, so the camera and
thus the computer vision application can see them correctly. For the projection onto a table,
the surface needs to be dark though, so the user can see the projected image well enough.
Since these two necessary steps logically exclude each other, the solution is to operate in two different spectra:
The projection has to be visible to the user, so the computer vision
component needs to operate in a different, invisible spectrum such as
near infrared in the range of 850nm. Most CCD and CMOS meras are perfectly
sensitive within the near IR spectrum,
therefore infrared LED lamps can be used to illuminate the table.
All light from the visible spectrum needs to removed using an according filter,
so the computer vision algorithm is not disturbed by the projection.
Best results can be achieved by using a bandpass filter for the wavelength used for illumnination.
This filter has to be applied either direclty on top of the camera sensor or alternatively on top of the lens.
A possibly existing (faint pink) infrared blocking filter needs to be removed from the
camera sensor or lens before.
 NIR 850nm filter (US) (DE) |
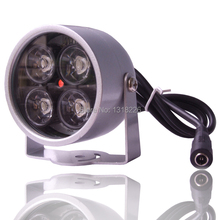 850nm Illuminator (CN) (US) |
 SFH4740 850nm LED (US) (DE) (ES) |  850nm IR Camera (US) (DE) (CN) |
camera
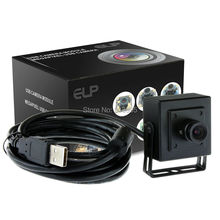
You should make sure that the camera has an acceptable lens and sensor size. For lowest latency and best performance we recommend firewire cameras from the top range, such as industrial cameras with a high framerate, resolution and sensor size. These cameras usually also come with high quality CS-mount lenses. From the large range of available USB cameras choose a model with a native resolution of at least 640x480 at a frame rate of 30Hz, although we recommend to use more recent UVC compliant USB cameras with MJPEG compression, which provide larger resolutions and frame rates up to 1280x720 at 60fps. DV cameras supporting full-frame mode are suitable, while those with interlaced mode only will interfere with the fiducial tracking.
|
(DE) (US) |
 OV2710 M12 (CN) OV2710 M12 (CN)(DE) |
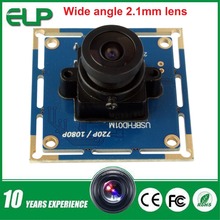 OV2710 board (CN) OV2710 board (CN)(DE) |
These affordable cameras based on the OV2710 sensor provide good image quality, high resolution and frame-rate, ranging from 640x480@120Hz and 1280x720@60Hz up to 1920x1080@30Hz. All three models are based on the same board, but come with diffent housings using CS-mount or M12-mount lenses. Make sure to choose a lens with an adecuate focal length and without IR blocking filter. |
projector
In order to cover a maximum table surface from a minimum distance, the chosen projector should provide a short-throw lens with a throw ratio of 0.6 and below. The projector has ideally to be placed upside-down projecting onto a small mirror placed in front of the lens in order to compensate for the usual lens-shift. Carefully adjust the angle of both the projector and the mirror, therefore avoid making use of the usually built in keystone correction, since this will further reduce the maximum available projection surface. Many projectors add a substantial latency to the overall system, therefore so-called "gaming projectors" with a specified mimimum latency (around 15ms) should be chosen. Obviously models with native Full-HD resolution with an adecuate lamp intensity will provide best image quality.
 Optoma GT1080 (US) (DE) |
 Optoma W305ST (US) Optoma W305ST (US)(DE) |
 Optoma ML750ST (US) (DE) |
These three example projectors from Optoma (Full HD, Normal HD and a lightweight LED) all provide a short-throw lens with a ratio around 0.5, reducing the overall projection distance and mirror size. The GT1080 is also specified with a particularly low lag, which greatly reduces the overall system latency. |
using reacTIVision
Fiducial Symbols
This application was designed to track specially designed fiducial markers. You will find the default "amoeba" set of 216 fiducials in the document "default.pdf" within the symbols folder. Print this document and attach the labels to any object you want to track. The default fiducial tracking engine is based on the included fidtrack library, which also provides an alternative "classic" fiducial set, which are a reimplementation of Enrico Costanza's d-touch concept. See below how to configure the application to use these symbol sets.
Finger Tracking
Since reacTIVision was initially designed for fiducial tracking, its thresholder and segmentation modules are optimized for this task. Finger tracking was added at a later stage, and is taking advantage of the existing image processing infrastructure with almost no additional performance overhead. On the other hand it may seem difficult to set up reacTIVision in order to achieve good tracking performance for both the fiducial symbols and the finger tips. When used with diffuse illumination, the setup needs strong and even illumination in order to achieve the necessary contrast for finger tracking, also the overall image control such as brightness, gain and shutter speed will improve the tracking quality (O key). Another important control parameter is the threshold "gradient gate" which should be set as low as possible, just before too much image noise becomes visible (G key). Finally the finger tracking can be configured by adjusting the average finger size and tracking sensitivity (F key).
Application Handling
Common settings can be edited within the file "reacTIVision.xml" where all changes are stored automatically when closing the application. Under Mac OS X the XML configuration file can be found within the application bundle's Resources folder. Select "Show Package Contents" from the application's context menu in order to access and edit the file.
The reacTIVision application usually sends the TUIO messages to port 3333 on locahost (127.0.0.1) You can change this setting by adding or editing the XML tag <tuio host="127.0.0.1" port="3333"> to the configuration.
The <fiducial engine="amoeba" tree="default"/> XML tag lets you select the fiducial engine or an alternative amoeba tree order. The default engine is using the fastest and effective 'amoeba' fiducial set. Add the 'classic' option in order to use the dtouch reimplementation from libfidtrack.
The display attribute defines the default screen upon startup. The <image display="dest" equalize="false" gradient="32" /> lets you adjust the default gradient gate value. reacTIVision comes with a background subtraction module, which in some cases can simplify the recognition performance of both the finger and fiducial tracking. Within the running application you can toggle this with the 'E' key or recalculate the background subtraction by hitting the SPACE bar.
The camera options can be adjusted by pressing the 'O' key.
On Windows and Mac OS this will show a system dialog that allows
the adjustment of the available camera parameters. On Linux (Mac OS X
when using IEEE1394 cameras), the available camera settings can be
adjusted with a simple on screen display.
The overall camera and image settings can be configured within the
"camera.xml" configuration file. On Mac OS X this file is as well
located in the Resources folder within the application bundle.
You can select the camera ID and specify its dimension and framerate,
as well as the most relevant image adjustments. Optionally you can also
crop the raw camera frames to reduce the final image size.
Please see the example options in the file for further information.
You can list all available cameras with the "-l" startup option.
TUIO vs. MIDI
The application can alternatively send MIDI messages, which allows to map any object dimension (xpos, ypos, angle) to a MIDI control via an XML configuration file. Adding and removing objects can be mapped to simple note ON/OFF events. Keep in mind though that MIDI has less bandwidth and data resolution compared to Open Sound Contol, so the MIDI feature is meant as an convenient alternative in some cases, but TUIO still will be the primary messaging layer.
Adding <midi config="midi/demo.xml"/> to reacTIVision.xml switches to MIDI mode and specifies the MIDI configuration file that contains the mappings and MIDI device selection. An example configuration file "demo.xml" along with an example PD patch "demo.pd" can be found in the "midi" folder. You can list all available MIDI devices with the "-l midi" option.
Calibration and Distortion
Some tables, such as the reacTable are using wide-angle or fish-eye lens in order to increase the area visible to the camera at a minimal distance. These lenses unfortunately distort the image and reacTIVision can correct that distortion and the overall alignment of the image. For the calibration print and place one of these rectangular or square calibration sheets on the table and adjust the grid points to the grid printed on the sheet.
To calibrate reacTIVision switch to calibration mode hitting 'C'.
Use the keys A,D,W,X to move within grid, moving with the cursor keys will adjust the grid point.
'J' resets the whole calibration grid, 'U' resets the selected point and 'K' reverts to the saved grid.
To check if the distortion is working properly press 'R'. This will show
the fully distorted live video image in the target window. Of course the distortion algorithm only corrects the found positions instead of the full image.
compiling reacTIVision
The reacTIVision source archive comes with IDE projects for all three supported operating systems. For Windows a Visual Studio 2012 project is provided, for Mac OS X there is an XCode 3.2 project included and for Linux a simple Makefile does the job. Compilation on Windows does not require the installation of any additional libraries, and also the MacOS X provides the necessary SDL2 and VVUVCKit Frameworks. The Linux port additionally depends on installed libsdl2, libdc1394-2.0 and libjpeg-turbo development libraries.